Indoor Shooting

Today's post comes from the book Master's Guide to Off-Camera Flash: Professional Techniques for Digital Photographers by Barry Staver. This book is available from Amazon.com, Barnes & Noble and other fine retailers.

Event photographers who regularly shoot with flash use one of two methods to create exciting photographs. Either they override the ballroom lighting (which can be very dark) with a multiple-flash remote setup, or they blend the ambient room light with some flash fill.

As a lifelong photojournalist I’ve always liked the freedom and flexibility to move around in a space, free to photograph anyone anywhere. That makes using a multi-flash system awkward for me when covering events indoors. I’ve tried it and Murphy’s Law intervenes each time because the best angle for a photograph usually has one of my lights on a light stand in the way in the background.

Instead, I like to use one off-camera flash, handheld or temporarily placed on a nearby surface. This lets me successfully blend the ambient and flash light bouncing or “foofing” the flash. It also allows me complete freedom to roam about the venue, capturing candid moments as they unfold. You just have to be sure the room has enough ambient light and light-colored walls. For this approach, setting your camera to the manual or aperture-priority mode will be the best choice. If the room light indicates a shutter speed of 1/30 second or slower and you need to stop action (dancing), then the manual setting will do a better job. You’ll also need more flash in the mix, since a shutter speed of 1/30 second or slower with fill flash will show motion blur from the subjects. Increasing the shutter speed to 1/50 or 1/60 second with the extra flash may still reveal some small amount of blur, but it will not be an unacceptable amount.

Some photographers use off-camera remotes (on light stands or otherwise fixed in place) to light a room from one or two sides and only shoot outward from these sides, avoiding the problem I
encounter. Aside from resorting to straight flash, this may be the only way to light a room that has dark walls and/or ceilings.

Single off-camera flash lighting was used to create these first-dance photographs. In the first two images, a speedlight with the flash head zoomed to 50mm was set on top of one of the speakers used by the orchestra and fired remotely from the on-camera master. Matthew then used both wide-angle and telephoto lenses to capture the couple as they enjoyed their first dance together as husband and wife. it takes patience and a bit of luck for this method to work, because you can only shoot when they dance across the area that will be lit by the flash.


For this image, a remote speedlight was placed on a table in the background for rim lighting on the couple during their first dance.

Mixed Lighting

Today's post comes from the book Doug Box's Flash Photography: On- and Off-Camera Flash for Digital Photographers by Doug Box. It is available from Amazon.com and other fine retailers.


Color Conversion Gels
Every light source, natural or artificial, has a specific color temperature, measured in Kelvin degrees. Daylight and flash, for instance, have a color temperature of about 5500K, while incandescent light measures about 3200K. The lower the temperature of the source, the “warmer” the light. The higher the color temperature, the “cooler” the light.

When you’re working in the studio, you have complete control over your lighting. However, when you’re shooting on location, you will encounter many lighting variables. When you’re faced with working with lights of different color temperatures, you have a powerful tool at your disposal: gels. These gelatin sheets can be used to modify your light source, changing the color temperature of your flash. You cannot gel the ambient light, so you must gel your on or off-camera flash to match the color temperature of the ambient light.

Here is an image taken on a cruise ship. It was nighttime, so the incandescent lightbulbs provided the only light in the scene. To capture the final image, I determined the exposure, placed a conversion filter on my flash, and changed the camera’s white balance preset to incandescent. That was it.

I photographed this image using an off-camera flash (5500K) modified with a color conversion gel to bring the flash temperature to 3200K. I also set the camera’s white balance preset to incandescent in order to produce neutral skin tones on the subject. However, the rest of the image has a blue color cast because the light is 5500K or higher. In addition, the light is flat and boring. The exposure was f/4 at 1/6 and ISO 200. The flash metered at f/4.


Here is the setup shot for the final image. The softbox was placed at the 45º/45º position. It was positioned perpendicular to the ground, so that the face of the box was parallel to the subject’s face. If you take a close look the final image, you can see that this rendered the face perfectly lit, and the light gently fell off so the subject’s shirt and pants—and even the rock wall—did not appear overlit. A small Morris Midi light with a warm gel was used below and behind the subject as a rim light.


Here is the final image. Selecting a faster shutter speed (1/60) rendered the background 3.5 stops underexposed, rendering the sky darker and more dramatic.

Case Study: Gels and Exposure Compensation
The images of the biker below were made in a challenging lighting situation. Let’s take a look at how I was able to make a successful image using gels and flash exposure compensation.

Here’s the scenario: The light in this scene came from streetlights—sodium vapor lights with a color temperature of roughly 2750K. I didn’t have the proper gel to convert my flash to 2750K, so I used a color conversion gel to produce an incandescent color balance, which is approximately 3200K. As you can see, the background is a little warm and the man’s back is too dark. The color isn’t perfect, but I like the way it looks. The exposure was f/4 at 0.5 second and ISO 200. In the first image, the on-camera flash was off.

To create the second, third, and fourth and fifth images in the series, I changed the flash exposure compensation on my ungelled on-camera flash to –3, –2, and –1, and 0 respectively. I used the flash compensation setting on the back of the flash rather than making the change via my camera. It is faster and allows for a –3 exposure, versus the camera’s maximum setting of –2. Each of the images in this series was made using the E-TTL mode on the on-camera flash, and each has a different contrast range, yet the images were captured almost as quickly as the flash recycled. The exposure of the subject’s face was consistent throughout all of the images because the off-camera flash was used in manual mode. The camera was also used in the manual mode.

Each of the images in this series was made using the E-TTL mode on the on-camera flash, and each has a different contrast range, yet the images were captured almost as quickly as the flash recycled. Note that the subject’s back, which was initially quite dark, became lighter with each exposure change. The exposure of the subject’s face was consistent throughout all of the images because the off-camera flash was used in manual mode. The camera was also used in the manual mode. As the man’s back becomes lighter, it also becomes more blue because of the color cast that an ungelled on-camera flash added when lighting the back of the subject.What a difference using gelled flash can make! The flash exposure compensation for the final image was set to –2.


Using Gels for Creative Effect
Sure, gels come in handy when you need to convert your flash units to match the color of the ambient light in the scene, but you can also use gels to create more interesting effects. There are some times when you may want to add strong color to a background or to an overall scene to create a more diverse array of image looks or moods. I keep a pack of gels in my camera bag at all times. I am surprised at how often I grab a little piece of color magic.

The images on the next page show how you can use gels to create a wide variety of portrait looks for your clients. By adding creative color to your images, you can add mood and character to your portrait offerings, which can lead to bigger sales.

This image was made with an ungelled flash and a softbox

Here, you can see the effect that was achieved when a purple gel was added to the kicker light (a flash) positioned behind the subject. I like both photographs, but the one made with the gelled flash seems to have more depth and appeal.


To create these two images, I used small Morris slaves with gels to color the black corrugated tin background.

To create the final image, I simply pointed the lights toward the camera, and they became an interesting part of the overall composition.

Underfill and Underlight

Today's post comes from the book Christopher Grey's Advanced Lighting Techniques by Christopher Grey. It is available from Amazon.com and other fine retailers.

This lesson will build on many of the techniques I’ve written about previously, although I’ll break a “rule” or two along the way.We’ll take a look at underlighting, a technique in which a bright highlight is added to the subject from below. No, it’s not the old flashlight-under-the-face trick that’s scared more than its share of cub scouts.What I’ll demonstrate can be subtle or bold and, in each case, will contribute more than its share of zip to the image.

First, I wanted to work with traditional Hollywood lighting techniques using only soft light. Traditional Hollywood lighting used mostly hot lights with relatively small reflectors. Fill, if any, was created with bounce cards or hot lights set in a large, curved surface. Given the ease of working with studio strobes, I can only imagine how uncomfortable it must have been posing so close to those sources, holding a position and attitude for as long as it took to focus, load, and shoot the 11x14-inch view cameras that were so often used. I wanted to make it easier on the model—and even easier on me.

Lights, no matter where they’re placed, require distance from the subject to do their jobs properly. Since I wanted to do a reclining portrait that looked as though the model’s chair was on the floor, I first had to build a platform to give the lights some room and hide them from the camera. Three collapsible sawhorses and a sheet of 3/4-inch plywood, placed about 9 feet in front of the background, did the job nicely. See below.


I set a head with a standard parabolic reflector about 12 inches in front of the background. I used my reverse cookie to get the splotchy background, leaning it against the middle sawhorse at an angle to reflect light from the parabolic back onto the paper. This strobe was also responsible for the small curved highlights on the chair frame in the shadow of my model’s back. Once the main light was set, the parabolic was powered to read one stop less at the brightest part of the reflection, measured at the background.

My main light was a 2x3-foot softbox, set slightly to camera right. It was also placed close, within 18 inches of the model’s face, so the light would fall off quickly and not light her evenly. Most of the light you see across her body is from the 1x6-foot strip light softbox I used for her hair light. The strip light was powered to equal the main light, as measured at her hair, so it naturally would fall off a bit as it made it to her dress. The underlight was a 2x2-foot softbox, set on the floor underneath the main light. It was powered one stop less than the main light when measured at the model’s face. Working exactly the opposite of the hair light, the underlight was more powerful on the model’s body than on her face. See diagram below.


It was a complicated setup, but the results were certainly worth the trouble. The underlight added interest and contour to her left forearm, hip, and chest. It also filled in under her chin and brow without being bright enough to detract from the main light. A second shot, converted to black & white, shows the true “spirit of Hollywood” scenario. Notice the low catchlights in her eyes and the reflection on her upper lip. The shot is smokin’ hot.


As complicated as this setup is, it is actually quite versatile. By moving only the main light, now at camera left, we changed the entire look of the image. The effect, shown in the image below, is subtle but beautiful. Harder light, by virtue of its additional contrast, will boost highlight accents and sharpen them.


The model went to change into something less formal, a swimsuit and top. While she was in wardrobe and makeup, I removed the reverse cookie and the light that had been aimed at it, substituting three heads with parabolics on the floor close to the rear of the platform. Each was fitted with a grid to control the spread of the light and positioned to light the model from below and behind. The light at camera left carried a 20 degree grid and was powered to plus 2/3 stop at its brightest point. The rear light struck the bottom of her hair and the inside of her camera-right arm, while light from the camera-right unit struck her side. Both were fitted with 30 degree grids and powered to plus 1/3 stop over the main light at their hot spots. An additional light, a beauty bowl with a 25 degree grid, was aimed at the top of her head from a boom arm.

My main light was a 7-foot umbrella placed slightly off-axis to camera right. I love the light the thing produces, but it does take up a lot of real estate. A large, standard umbrella or softbox would do the job nicely. Diagram below.


For this image, my model was instructed to move into a position that could take advantage of the three lights. The lights were tweaked as necessary (and re-metered, of course). Because the hot spot of the camera-left light was aimed and metered at her torso, the kiss of light on the side of her jaw is softer and less bright. Notice also how stray light from the camera-right unit barely tags the underside of her eyebrow and the side of her cheek. These two small accents lend a great deal of dimensionality to the model’s face.


There are a couple of details you should be aware of when lighting from below:

• Underlight must be brighter than the main light; otherwise, it’s just fill light.

• The underlight should never be the main light on a face unless you’re going for the “bad horror movie” look. Instead, let the light “kiss” the face in areas that are not overly important to the physicality of the model such as the edges of the mouth, nose, and forehead.

• Watch all up-shadows. Angle your lights so shadows falling on the body are minimal, if they are there at all.

• Follow the usual guidelines for main light placement. Make sure the nose shadow follows the line of the cheek in a graceful and attractive manner.

I’m sure you can see the value of this extra accent lighting whether you use it for fashion or straight portraiture. As long as it suits your subject, any time you can add extra zip to your images (no matter how many lights you use), you’re one step ahead of your competition and one step closer to developing a drop-dead personal style.

Direction of Light

Today's post comes from the book Lighting Techniques for Photographing Model Portfolios by Billy Pegram. It is available from Amazon.com and other fine retailers.

In addition to its quality, you must also consider the direction of the light. As noted above, light that comes from overhead is usually not flattering, because it creates dark shadows on the eyes. Instead, look for light that strikes the subject from another angle.

Front Light. Light that comes from directly in front of the subject is commonly used in beauty photography because it tends to smooth the skin and flatter female faces. However, it can also flatten the features and create a lack of depth in your image.

Angled or Side Light. Light that strikes the subject’s face from an angle puts highlights on one side of the subject (the side closer to the light) and shadows on the other side of the subject (the side farther from the light). This adds a sense of depth and helps show the shape of the subject. As a result, it is a great lighting choice for images designed to showcase the model’s body (such as fitness shots). Because light from the side accentuates texture, it also works well for clothing shots where texture needs to be visible. One downfall of this lighting is that the model’s face will be shown with texture, as well. This can be effective with men’s facial structure, but it is not normally as flattering to a woman’s face.

Light that skims across the body from the side is great for highlighting a toned physique.

Backlight. Backlight occurs when the light source is directly behind the subject and directed toward the camera. One thing to watch out for when using strong backlighting is lens flare. This occurs when light shines directly into the lens and results in a loss of contrast and color saturation, and in some cases the creation of bright geometric artifacts (reflections off the elements within the lens itself).

In this image, Backlighting created highlights to separate the subject from the background.

When paired with some kind of stronger front or side light, backlighting can add impact and separation to a photograph by accenting the edges of the subject, an effect called rim lighting. In the image above, a light placed at an angle to the subject illuminated her from the front. Two lights behind the subject created bright highlights (rim lighting) along the edges of her body, separating her from the background. In this case, the lights themselves also formed a compositional element in the background.

With a weaker (or nonexistent) front or side light, backlighting can also allow you to create silhouette (or semi-silhouette) effects. Experimenting with this technique you can achieve some amazing photographs. In the series of photographs below, I focused on the model. Her body shielded my lens, and I had her move slightly to my left so the sun would just break past her body. I varied the output of my flash for each photograph, achieving a variety of different exposure and results. Who is to say which exposure is correct?

Different flash settings combine with backlighting to produce a variety of effects.

Start With One Light

Today's post comes from the book Lighting Essentials: A Subject-Centric Approach for Digital Photographers by Don Giannatti. It is available from Amazon.com and other fine retailers.

I have a method that has served me very well for over thirty years: I build each shot one light at a time. In the studio, I get the main light ready, and then add the secondary. If I’m working outdoors or in a daylight studio, I find the placement of the ambient light and decide what I want to do with it. Perhaps the image calls for the background to be a bit overexposed. Or maybe dropping the ambient light down a couple of stops will add a dramatic flair to the image.

When making these fundamental decisions about ambient light, there are some important settings that must be taken into consideration, of course. If you are going to use only the ambient light and fill cards, remember that there is no way to overcome the ambient—no way to make any kind of light that will be stronger than the direct sun. You also have choices to make about your aperture and shutter speed. Why? Because they can be whatever you want. With natural light, you are not limited by anything other than your lens’s widest aperture and your camera’s fastest shutter speed.

If you will be augmenting the ambient light with strobes, you’ll need to have an idea of what you want to do before you begin to sketch. For example, if I know that I am going to be bringing in my large strobes, I will set my camera to aperture priority (Av on my Canons) and choose the aperture I want to work with. My first consideration is aperture, but there is a real concern about the shutter speed, as well; I know that I cannot sync at shutter speeds faster than 1/200 second. If I chose f/8, then saw that the shutter speed dropped to 1/400 second, I would need to rethink my aperture—so the exposure might be made at f/11 at 1/200 second. Most of the time I will walk the scene with my meter (set within the required parameters of the camera and sync speed) and make notes of the highlights, shadows, and midtones in the scene.

Sample Shoot: Stephanie on the Docks. I saw this image as I walked up onto the covered dock. I loved the incredible sky, the boats, the way the light was playing off the water, and the different shapes of the buildings around the background. I wanted to do something dramatic, so I sketched in a shot while we were setting up the boomed softbox.

The setup for my image of Stephanie.


The direct strobe from the left adds some nice highlights and the softbox from the right gives her face the soft light I wanted. The sun gave me some wonderful shadows coming in from behind, and the look was what I saw in my head when I walked up to the scene.

I started by considering the ambient light. This seemed to be sufficient for the background feel I wanted. However, I needed more light on Stephanie, so I added a softbox on a boom to illuminate her face and jacket. With the ambient light on the background and the main light on Stephanie in place, I determined that the light from camera left was a little lacking. Adding
some light from that side would create a more dramatic, three-dimensional feel in the shot. Therefore, I placed a bare strobe at a low angle to camera left. I wanted the light to seem like a reflection on her, not a “full light” as from an instrument.

Sample Shoot: Jazmin and Column. For this shot (below), Jazmin was posed on a column at a beach house we used during a workshop in Mexico. The sun was on her face and I knew the light would be a perfect “Sunny 16” on her. But that also meant that the shadows would be too dark for what I saw in my head. Knowing this about the ambient light, I added a speedlight at f/11. This was aimed it at the shadow side of her. I immediately saw that I needed another light to add something to the ceiling; it was going far too dark. I aimed this speedlight at the ceiling but away from the camera. I wanted it to produce an “open shadow” feel, not look lit, so I settled on getting an f/8 on the ceiling—two stops away from the f/16 ambient level. The resulting image has a nice feeling of light to it, with just a little drama. Jazmin added the wonderful pose and I got the shot in only a few exposures.

Building one light at a time allowed me to design the image of Jazmin I envisioned when I saw this location.

The point is this: Don’t try to get it all at one time. Building the image one light at a time lets you see the possibilities—and alerts you to places to improve. After you do this for a while, it becomes second nature; while you may be building the setup one light at a time, you are thinking so far ahead that it feels seamless to those around you.

D.I.Y. Modification Device: The Light Can

Today's post comes from the book Studio Lighting Unplugged: Small Flash Techniques for Digital Photographers by Rod & Robin Deutschmann. It is available from Amazon.com and other fine retailers.

Our go-to light modifier for directed-light studio work is the light can. It’s a powerhouse version of the classic snoot. When you place it on your light, it stops flare and eliminates spill. When you place it on your flash, you create a spotlight.


You can create a light can for less than $4 (so you might as well make a few!). Here is how it’s done:

• Cut the bottom off a large Quaker Oats canister.
• Cut a hole in the middle of a large, thick sponge.
• Squeeze the sponge into the bottom of the canister.
• Push the flash through the hole in the sponge.
• There you have it—your first light can!


As this trio of images shows, the light can is an inexpensive modifier that offers a practical way to
add light to specific sections of your image.


A bare-tube flash spreads light through a room, bouncing it from one corner to another. With a light can attached to your flash, you will be able to quickly and effectively corral the light from a small flash.


Adding a piece of children’s modeling foam to the light can gives you even more control of the width of the beam, as illustrated in these images.


Here we see three different sized light cans and the spotlight effects they produce. The light can on the left was made from a Pringles potato chip canister. The second was made from a modified Quaker Oats canister (we added a piece of foam to restrict and corral the light). The third light can is the Quaker Oats canister, without the foam covering.

Key Light and Fill Light for Portraits

Today's post comes from the book Simple Lighting Techniques for Portrait Photographers by Bill Hurter. It is available at Amazon.com and other fine retailers.

Key Light
The function of the key is to shape the subject. It should draw attention to the front plane (the “mask”) of the face. Where you place the key light will determine how the subject is rendered. You can create smoothness on the subject’s face by placing the light near the camera and close to the camera/subject axis, or you can emphasize texture and shape by skimming the light across the subject from the side.

The key light should be a high-intensity light. If using diffusion, such as an umbrella or softbox, the assembly should be supported on a sturdy stand or boom arm to prevent it from tipping over. If undiffused, the key light should have barn doors affixed to control the light and prevent lens flare.


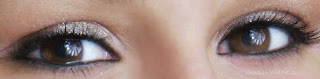
Here is an example of a really big key light. Charles Maring often uses a 7-foot Profoto reflector as a single key light with no fill. In the close-up of the senior’s eyes (below), you can see the differentiated interior of the round reflector, with varying degrees of reflectivity mirrored in her eyes. A single strobe fired into this reflector created this amazingly soft wraparound lighting. The exposure was at f/16 to keep all the girl’s hair in focus.


In most cases, the key light is placed above and to the side of the face so that it illuminates both eye sockets and creates a shadow on the side of the nose. The nose shadow should not cross over onto the cheek, nor should it go down into the lip area.

When the face is turned for posing, the key light must also be moved to maintain the lighting pattern. For example, the light will be positioned at approximately a 45-degree angle to the camera when photographing the full face of a subject. However, when the subject turns to show the camera a two-thirds facial view, the key light will need to shift with the camera to maintain the same lighting pattern as in the first shot.


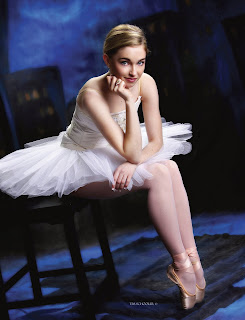
In this beautiful portrait by Tim Schooler, the large key light, a soft box, was placed to camera right. Because the light was so diffused, Tim did not use a fill light or reflector. Instead, he positioned the light to optimize its coverage from the subject’s feet to her hair. In addition, he used a fairly strong hair light (a strip light) above the model to amply light her hair. The size and proximity of the subject to the key light make for elegant and very soft lighting.

Normally, you will want to position the main light close to your subject without it appearing in the frame. A good working distance for your key light, depending on your room dimensions, is eight to twelve feet. Sometimes, however, you will not be able to get the skin to “pop,” regardless of how many slight adjustments you make to the key light. This probably means that your light is too close to the subject. Move the light back or feather it.

To get an accurate exposure reading, position a handheld exposure meter directly in front of the subject’s face and point it toward the light source. Make a few exposures and verify the exposure on the camera’s LCD. If your system allows you to check a histogram of the exposure, check it to make sure you have a full range of highlight and shadow detail.

Fill Light.
Just as the key light defines the lighting, the fill light augments it, controlling the lightness or darkness of the shadows created by the key light. Because it does not create visible shadows, the fill light is defined as a secondary light source.

The fill light should always be diffused. If it is equipped with a simple diffuser, a piece of frosted plastic or acetate in a screen or frame that mounts over the parabolic reflector, it should also have barn doors attached. If using a more diffused light source, such as an umbrella or softbox, be sure that you are not “spilling” light into unwanted areas of the scene, such as the background. As with all lights, these units can be feathered, aiming the core of light away from the subject and just using the edge of the beam of light.


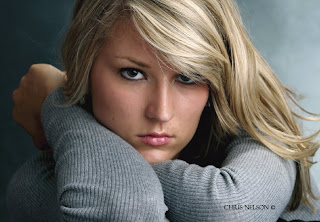
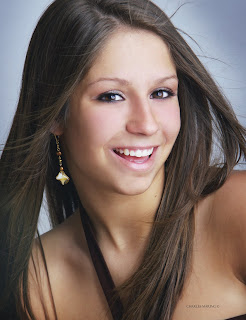
Chris Nelson photographed this young lady with a softbox as a main light. He used a silvered reflector for fill, a strip light for the hair light, and a background light. The softbox and strip light were set to the same output level; the background light was set to a stop less. The camera angle was about a foot over the subject using a telephoto lens. He used a fan on low to give her hair some fill and lift. Chris says of this pose, “Never use it unless your subject has long sleeves on, and don’t use it if the arms are abnormally large or well developed.”

The best place for the fill source is as close as possible to the camera-to-subject axis. All lights, no matter where they are or how big, create shadows. By placing the fill light as near the camera as possible, all the shadows that are created by that light are cast behind the subject and are less visible to the camera.

When placing the fill light, keep a watch out for unwanted highlights. If the fill light is too close to the subject, it often produces its own set of specular highlights, which show up in the shadow area of the face and make the skin appear oily. If this is the case, move the camera and light back slightly, or move the fill light laterally away from the camera slightly. You might also try feathering the fill light in toward the camera a bit. This method of limiting the fill light is preferable to closing down the barn doors or lowering its intensity.

The fill light can also create multiple catchlights in the subject’s eyes. These are small specular highlights in the iris. The effect of two catchlights (one from the key light, one from the fill light) is to give the subject a vacant stare or directionless gaze. This second set of catchlights is usually removed in retouching.


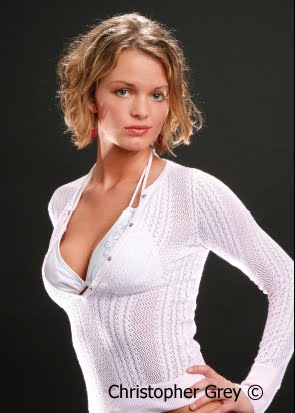
In this beautiful glamour portrait by Tim Schooler, the key light comes from behind the subject a little to camera right. You can determine this because the right side of her face and nose are highlighted. The fill light, which is close to the same intensity as the key light, comes fromcamera left and fills the shadow side of the model’s face. Additional fill is achieved by the white crepe material, which is reflecting light everywhere within the scene. You will notice that even though the lights are fairly even in intensity, the key light still provides direction and bias.

In simplified lighting patterns, the source of the fill light may not be a light at all but a reflector that bounces light back onto the subject. This means of fill-in has become quite popular in all forms of photography. The reflectors available today are capable of reflecting any percentage of light back on to the subject, from close to complete reflectance with various mirrored or Mylar-covered reflectors to a very small percentage of light with other types. Reflectors can also be adjusted almost infinitely just by finessing the angle at which they are reflecting the fill light.


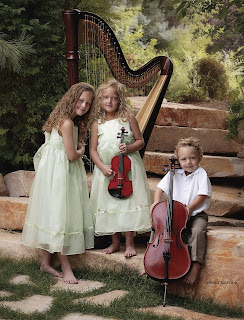
Master photographer Drake Buseth often uses the outdoors as his studio. Even so, a key light and fill light are still called for. Here, a large softbox was used over the lens as the key light and a large reflector was angled up from beneath the camera as a fill-in source. The effect produces a gentle lighting ratio.


THE PERFECT FILL
If it were a perfect world, fill light would be shadowless, large, and even—encompassing every part of the subject from top to bottom and left to right. The fill light would be soft and forgiving and variable. And it would complement any type of key lighting introduced.

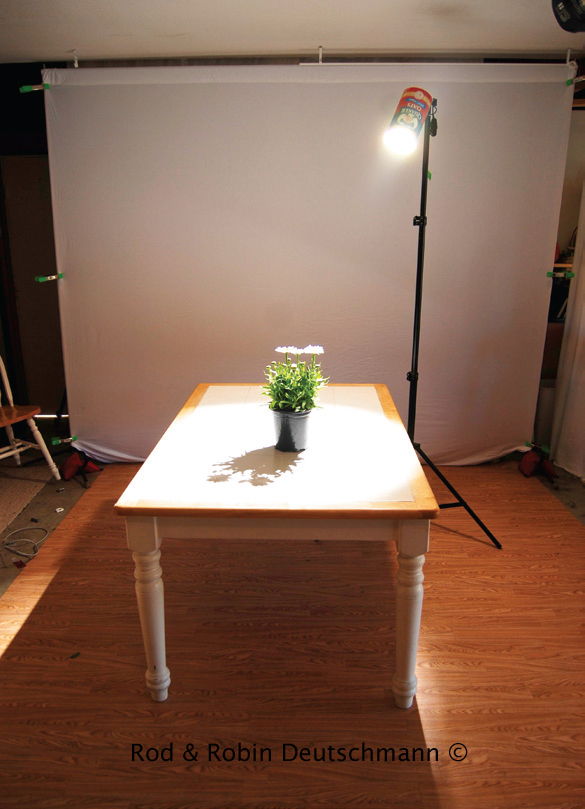
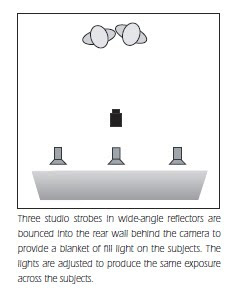
Just such an effect can be created using strobe heads in wide-angle reflectors bounced into a white or neutral gray wall, or a flat behind the camera (the surface must be neutral to ensure no color cast is introduced). Usually, the first two lights are placed to either side of the camera, then the third is placed over the camera and aimed high off the flat or the wall/ceiling intersection.

These lights are placed close to the wall and ceiling, creating a wall of soft light. These fill lights are then balanced to produce an identical output across the subject. The key light, which may be placed to the side or above the subject, will be equal to or more intense than the fill source, creating a ratio between the fill and key lights.

A variation on this setup is to rig a large white flat over and behind the camera. Two or three strobe heads can then be bounced into the flat for the same effect as described above. Some of the light is bounced off the flat and onto the ceiling, providing a very large envelope of soft light.