
 Today's post comes from the book Christopher Grey's Advanced Lighting Techniques by Christopher Grey. It is available from Amazon.com and other fine retailers.
This lesson will build on many of the techniques I’ve written about previously, although I’ll break a “rule” or two along the way.We’ll take a look at underlighting, a technique in which a bright highlight is added to the subject from below. No, it’s not the old flashlight-under-the-face trick that’s scared more than its share of cub scouts.What I’ll demonstrate can be subtle or bold and, in each case, will contribute more than its share of zip to the image.
First, I wanted to work with traditional Hollywood lighting techniques using only soft light. Traditional Hollywood lighting used mostly hot lights with relatively small reflectors. Fill, if any, was created with bounce cards or hot lights set in a large, curved surface. Given the ease of working with studio strobes, I can only imagine how uncomfortable it must have been posing so close to those sources, holding a position and attitude for as long as it took to focus, load, and shoot the 11x14-inch view cameras that were so often used. I wanted to make it easier on the model—and even easier on me.
Lights, no matter where they’re placed, require distance from the subject to do their jobs properly. Since I wanted to do a reclining portrait that looked as though the model’s chair was on the floor, I first had to build a platform to give the lights some room and hide them from the camera. Three collapsible sawhorses and a sheet of 3/4-inch plywood, placed about 9 feet in front of the background, did the job nicely. See below.

I set a head with a standard parabolic reflector about 12 inches in front of the background. I used my reverse cookie to get the splotchy background, leaning it against the middle sawhorse at an angle to reflect light from the parabolic back onto the paper. This strobe was also responsible for the small curved highlights on the chair frame in the shadow of my model’s back. Once the main light was set, the parabolic was powered to read one stop less at the brightest part of the reflection, measured at the background.
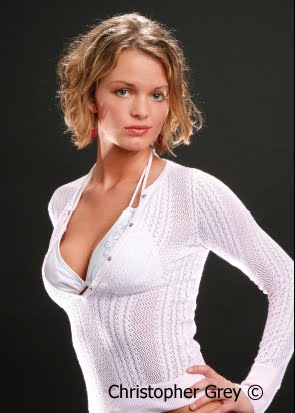
My main light was a 2x3-foot softbox, set slightly to camera right. It was also placed close, within 18 inches of the model’s face, so the light would fall off quickly and not light her evenly. Most of the light you see across her body is from the 1x6-foot strip light softbox I used for her hair light. The strip light was powered to equal the main light, as measured at her hair, so it naturally would fall off a bit as it made it to her dress. The underlight was a 2x2-foot softbox, set on the floor underneath the main light. It was powered one stop less than the main light when measured at the model’s face. Working exactly the opposite of the hair light, the underlight was more powerful on the model’s body than on her face. See diagram below.

It was a complicated setup, but the results were certainly worth the trouble. The underlight added interest and contour to her left forearm, hip, and chest. It also filled in under her chin and brow without being bright enough to detract from the main light. A second shot, converted to black & white, shows the true “spirit of Hollywood” scenario. Notice the low catchlights in her eyes and the reflection on her upper lip. The shot is smokin’ hot.

As complicated as this setup is, it is actually quite versatile. By moving only the main light, now at camera left, we changed the entire look of the image. The effect, shown in the image below, is subtle but beautiful. Harder light, by virtue of its additional contrast, will boost highlight accents and sharpen them.

The model went to change into something less formal, a swimsuit and top. While she was in wardrobe and makeup, I removed the reverse cookie and the light that had been aimed at it, substituting three heads with parabolics on the floor close to the rear of the platform. Each was fitted with a grid to control the spread of the light and positioned to light the model from below and behind. The light at camera left carried a 20 degree grid and was powered to plus 2/3 stop at its brightest point. The rear light struck the bottom of her hair and the inside of her camera-right arm, while light from the camera-right unit struck her side. Both were fitted with 30 degree grids and powered to plus 1/3 stop over the main light at their hot spots. An additional light, a beauty bowl with a 25 degree grid, was aimed at the top of her head from a boom arm.
My main light was a 7-foot umbrella placed slightly off-axis to camera right. I love the light the thing produces, but it does take up a lot of real estate. A large, standard umbrella or softbox would do the job nicely. Diagram below.

For this image, my model was instructed to move into a position that could take advantage of the three lights. The lights were tweaked as necessary (and re-metered, of course). Because the hot spot of the camera-left light was aimed and metered at her torso, the kiss of light on the side of her jaw is softer and less bright. Notice also how stray light from the camera-right unit barely tags the underside of her eyebrow and the side of her cheek. These two small accents lend a great deal of dimensionality to the model’s face.
There are a couple of details you should be aware of when lighting from below:
• Underlight must be brighter than the main light; otherwise, it’s just fill light.
• The underlight should never be the main light on a face unless you’re going for the “bad horror movie” look. Instead, let the light “kiss” the face in areas that are not overly important to the physicality of the model such as the edges of the mouth, nose, and forehead.
• Watch all up-shadows. Angle your lights so shadows falling on the body are minimal, if they are there at all.
• Follow the usual guidelines for main light placement. Make sure the nose shadow follows the line of the cheek in a graceful and attractive manner.
I’m sure you can see the value of this extra accent lighting whether you use it for fashion or straight portraiture. As long as it suits your subject, any time you can add extra zip to your images (no matter how many lights you use), you’re one step ahead of your competition and one step closer to developing a drop-dead personal style.
I love your article, I want to know about LED strip lights
ReplyDeleteThanks for sharing the Exclusive Article.
ReplyDeleteLed lights pakistan
Great post! I love how you explain the concepts of underfill and underlight so clearly. It’s really helpful for anyone looking to improve their lighting design techniques. Global Talent Pathway
ReplyDeleteWhat an insightful blog! "Underfill and Underlight" offers a fresh perspective on two often overlooked aspects of design. The way you've explained the importance of underfilling in creating more balanced and functional spaces is spot on. I also loved the tips on underlighting – it’s amazing how something as simple as the right lighting can completely transform a room's ambiance. The practical examples you’ve provided really help in understanding how to incorporate these concepts into everyday design. This post is definitely going to inspire me to pay more attention to the finer details in my own projects. Keep up the great work! THEJEMBE
ReplyDelete